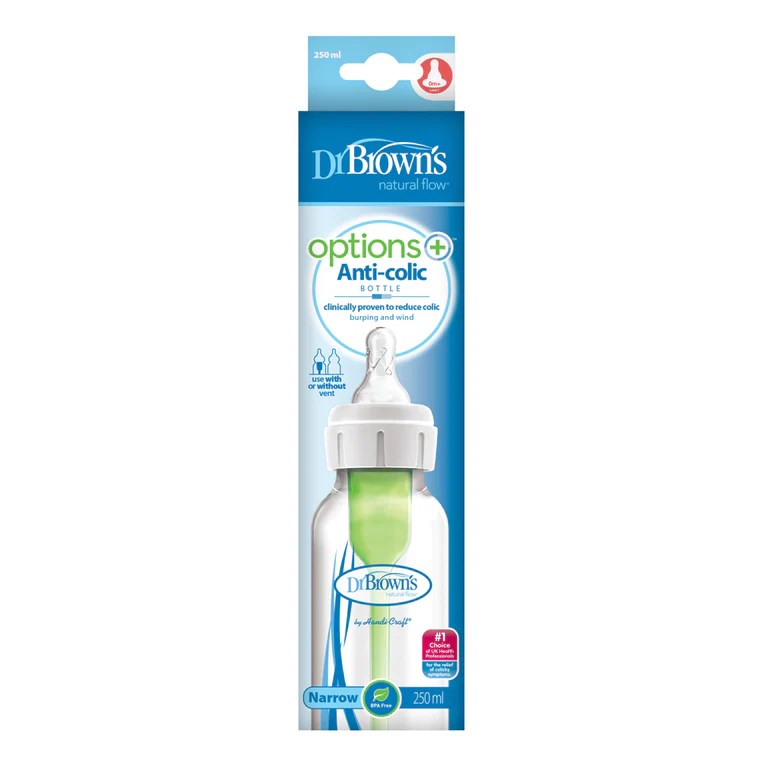
Dr Brown's Narrow Neck Bottle Level 1 - 250ml
Dr Brown's Narrow Neck Bottle Level 1 - 250ml
SKU:SB81005
In stock
Couldn't load pickup availability
Overview
Overview
The same trusted bottle, with added benefits The new Dr Brown’s Options – the first convertible bottle that can be used with or without the green vent system. The unique internal green vent system continues to create 100% vacuum free feeding, which is clinically proven to help reduce wind related colic. This is what makes 9 out of 10 Healthcare Professionals recommend Dr Brown’s for the relief of wind related colic.
As baby becomes more developed the bottle can be used without the green vent system to work more like a conventional, teat-vented bottle. The new Dr Brown’s scalloped designed teat allows air to vent through bottle when green vent system is not used for when babys feeding it developed or parents just want the convenience of a teat vented bottle.
Technical Specification
Technical Specification
User Guide
User Guide
Delivery and Returns
Delivery and Returns
- Delivery: Free within NZ on orders over $100 (excluding bulky items) or $8 standard shipping
- Returns: Accepted within 14 days of receipt with proof of purchase
- Some items are excluded from returns including sale items, hardware, car seats, prams, monitors and personal items - please click here for the full list.
Share this product
Recently Viewed Products
Related Blogs

Formula and bottle-feeding tips for new parents
Everything you need to know about bottle feeding During the first year, your baby goes through a great deal of growth and development. Most babies triple their birth weight by the time they hit their first birthday – so it’s no wonder they need lots of energy to grow! While it’s widely acknowledged that ‘breast is best’, choosing how you feed your baby is an important and completely personal decision. For some women, personal circumstance, cultural beliefs and physical or mental wellbeing mean breastfeeding isn’t an option, and therefore a safe alternative is required. If you’ve decided to bottle-feed (if you’re thinking about it, speak with your midwife, doctor or nurse first), it’s vital to have clear and well-informed information on the safe preparation and use of formula. Here’s what you need to know about formula-feeding your wee one: About baby formula Most formula is made from modified cow’s or goat's milk so the protein level isn’t too high and babies can digest it. Unlike regular milk, formula has added minerals, vitamins, and fats essential for human growth and development, and when prepared correctly, it contains enough nutrients for healthy growth in babies. In New Zealand, there are strict manufacturing regulations in place to make sure that the formula in your local supermarket is always of good quality and safe for your baby. But that doesn’t make the baby aisle any less overwhelming. Here’s a quick breakdown of the kinds of formula you can buy: Cow’s-milk formula Most cow’s-milk formulas sold in New Zealand have a similar nutritional profile – so price doesn’t necessarily mean one is better than another. Casein and whey are the proteins in breastmilk, and cow’s-milk formula has the same proteins. It will either have more casein or more whey – you can find the percentage of each noted on the formula’s ingredient label. Key points: Your baby’s first formula should contain whey as the main type of protein, as it’s the easiest to digest. Some formulas will be labelled ‘follow-on’ or ‘step 2’ – these are casein-dominant formulas best suited for babies aged six months and over. They’re also designed for hungrier babies who are not yet old enough to start solid food. Your baby can stay on the first formula for 12 months and as you start to introduce solids. If your child isn’t reacting well to cow’s-milk formula and you suspect an allergy, it’s best to seek advice from a healthcare professional who can advise you on alternative types of formula. Goat’s-milk formula This type of formula also contains whey and casein proteins, but the casein protein is slightly different from that in cow’s milk. It contains beta-casein (rather than alpha-casein) which is more easily digestible. Again, you can find the protein ratios outlined on the nutritional label. Soy infant formula Made using soya beans as a source of protein, soy infant formula is a vegetarian option. It’s best to seek advice from a healthcare professional before switching to the soy alternative. Gold formula Gold formula contains extra ingredients which aren’t strictly necessary for your baby – but may be beneficial. Here we explain a few: Long-chain polyunsaturated fatty acids (LCPUFAs). Thought to be important in the development of the brain and eyes. Alpha-lactalbumin. Thought to be nutritious for babies because it’s the main type of whey protein in breastmilk. Pro and prebiotics. These help promote the growth of good bacteria and may help maintain a healthy balance of gut bacteria. May be good for eye health. How to prepare baby formula Before you get started, always carefully read and follow the instructions on the formula tin – not all formulas have the same size scoops or are prepared in the same way. Check the use-by date and dispose of formula if it has expired. Bottle-feeding equipment Here’s what you’ll need to bottle-feed: Large bottles (saves you buying new ones as your baby grows) Bottle rings and caps Teats (either silicone or latex is fine, graded according to size of the hole or age of the baby) Bottle brushes Teat brushes A steriliser (optional) Check our handy guide to bottles and teats here! Making up a bottle of formula Step 1 : Boil the kettle and let the water cool for about 30 minutes, until it has reached a lukewarm temperature. You can also do this in advance, storing the cooled boiled water in sterilised bottles in the fridge. Step 2 : Pour the lukewarm water into the bottle before carefully adding the scoops of formula powder (levelling the powder with a clean knife or the tin's in-built level). Seal the bottle with a ring and cap, then shake gently to encourage the powder to dissolve. Step 3 : Before feeding your baby, check the temperature of the formula by tipping a few drops on the inside of your wrist – it should feel lukewarm. Never add anything to the formula, and if your baby doesn’t finish the bottle, throw any leftover formula away within an hour. Warming infant formula If you are not feeding your baby straight away, place formula in the fridge immediately (store at the back of the fridge) with a cap over the teat to prevent contamination. It can be stored for a maximum of 24 hours. Once removed, it’s only safe to use for up to one hour. The safest way to warm formula is to stand the bottle in a bowl of warm water for no longer than 10 minutes as harmful bacteria can grow in prepared formula. After warming, gently swirl the bottle to mix the formula, and test the temperature. If it’s too hot, cool it down by putting it in a bowl of cold water or by running it under the cold tap. Microwaving bottles is not recommended because uneven heating of the milk can burn your baby’s mouth. Cleaning and sterilising Hygiene is essential – your baby’s immune system isn’t strong enough to fight off some diseases yet, and formula-fed infants are at higher risk of gastrointestinal infection. You need to clean your bottles, teats, rings and caps after every feed and before you sterilise them. Tips for cleaning bottle-feeding equipment: Wash all bottles, rings, caps and teats in hot soapy water. Squirt water through the teat holes and use a bottle brush to ensure that everything is scrupulously clean, getting into all those nooks and crannies, then rinse well. Check for any cracks in the teats and throw away any damaged ones. Rinse everything well in hot water and leave them to air dry. After you’ve cleaned your equipment, you need to sterilise everything by boiling, steaming, or with chemicals. Boiling - To sterilise a baby bottle by boiling, place the disassembled bottle parts into a large pot and cover them fully with water. Bring the water to a rolling boil and let it boil for at least 5 minutes to ensure all parts are thoroughly sterilised. Use clean tongs to remove the items and place them on a clean, dry surface to air dry completely. You can buy electric (plug-in) or microwave steam sterilisers. These units 'cook' your equipment at a temperature high enough to kill bacteria. If using chemical sterilisers , follow the instructions on the box or packet. If you’re unsure, seek help from a professional Don’t be afraid to take your time deciding about feeding your baby. The most important consideration is that your baby is comfortable and well-fed, and you’re able to enjoy this special (albeit exhausting!) time with your newborn. Get the information you need to make an informed decision, and if you’re not sure, consult with your health professional, who’s in the best position to give you accurate advice for your baby and his or her needs.
Learn more
How To Store Your Breast Milk Safely and Successfully
Tips to Storing Your Breast Milk Safely, Sustainably and Successfully. If you are looking for ways to store your breast milk Dimples has plenty of solutions to make sure you are making the most of that liquid gold. Once baby has arrived you may decide pumping and storing your milk is a great solution, particularly if you are heading back to work or just if you are after a solution for when baby’s milk isn’t being fed straight from you. Collecting the First Stage of your Milk Colostrum is the first stage of milk you will develop during the late stages of your pregnancy as well as in the first few days after baby has arrived. Colostrum will appear in a thick clear or yellow consistency. Colostrum is filled with all the good nutrients your newborn will need in those early days to help begin building their immune system. What is the best way to store my breast milk? Once your breast milk has officially come in and you are wanting to store milk for another day, Dimples has everything you will need to make sure your supply is stored away safely and conveniently. Haakaa has created reusable milk storage bags designed out of silicone so you can reduce any waste in the environment that is caused by single-use plastics. The environment you choose to store your breast milk in may need to change based on when you are planning to feed baby. Breast milk is best when transferred to a cooler place after four hours, however, breast milk should remain stable within room temperatures that are 25ºC or lower between 6 and 8 hours. If you choose to store your breast milk within the refrigerator it should remain safe for use up to 2 days at a temperature of 4ºC or lower. If your breast milk isn’t required within this time frame it should be stored in the freezer after 48 hours. Breast milk can be stored in your basic fridge freezer for up to 3 months. How to prepare breast milk that has been stored . Preparing breast milk that has been previously frozen is simple. Placing the pouch in the refrigerator to thaw for several hours before use is an easy solution. When heating any form of milk for baby using a microwave should be avoided. Using a microwave can lead to heating milk unevenly and increase the risk of scalding your baby. To safely heat milk and have it ready for baby, simply stand the pouch in a bed of warm water (not boiled) and allow it to sit until it has reached a lukewarm temperature. Simply use a food thermometer to test the temperature of baby’s milk to always ensure that they are safe. Another option to heat your little one’s milk is using the Meke Milk Warmer . This item stocked by Dimples is an innovative way to heat baby’s milk whether it is breast milk, formula, or even hot chocolate. Simply choose the appropriate temperature and with the press of a button and your milky beverage is ready to go. Sterilising your equipment Being able to re-use the equipment required during your breastfeeding journey is a great positive not only does it significantly reduce costs, but it also has a positive effect on the environment with reduced consumption. Ensuring you have everything clean and sterilised will be an important part of your routine. Haakaa’s Silicone bottle brush is sized to fit perfectly into Haakaa’s silicone milk storage bags , the soft and flexible bristles are made from 100% silicone allowing you to reach all area’s giving a thorough clean. Dimples stocks all the solutions you will need to make your breastfeeding journey as simple and as gentle on the environment as possible.
Learn more
Tips for Successful Breast Pumping
How to express breast milk minus the stress 10 simple tips to get the pumping party started Whether a return to work is calling, you’re desperate for a night out or just keen to share the responsibility of feeding your baby, most new mamas eventually need some time off from breastfeeding. Enter the breast pump. While it might seem daunting at first, with tubes, suction and strange noises, it’s not so complicated once you get the hang of it. And just like any new skill, it can take a bit of time to learn. So how do you become a pumping pro? Read on to find out… Get started with the right pump : Before you meet your new baby, it’s a good idea to research, purchase and familiarise yourself with your breast pump. Depending on whether you’re planning on being an occasional pumper or pumping regularly, manual pumps like this one from Haaka and electric pumps like this one from Vital Baby each have different merits. That’s a whole other blog! The pre-pump clean-up : Before you get started, thoroughly wash your hands with soap and water, and ensure you’ve cleaned and sterilised your pump as per the manufacturer’s instructions. If you’re planning on storing the milk, cleanliness is super important to avoid passing any nasties on to your baby. Create a designated pumping spot : Whether it’s at work or home, find a comfortable, quiet spot where you can have some uninterrupted pumping time. Make your go-to spot cosy and relaxing, with everything you need on hand. You’ll want a good book (or your phone) to pass the time, snacks (lactation cookies are perfect), a bottle of water and some soothing nipple cream. Think of pumping as an opportunity for some precious time out rather than a dreaded chore. Get your seating right : Once you’ve found your spot, get your seating sorted. A comfy chair that supports your back is a must for pumping sessions that won’t leave you aching. Make sure your feet are flat on the floor and have a cushion or nursing pillow handy to support your pump-holding arm. Dress for pumping success : A feeding-friendly wardrobe is essential for easy pumping or breastfeeding access. Get the basics right, starting with a comfortable nursing bra like this one from Body Silk and then layer with buttoned shirts from your existing wardrobe or specific nursing tops or dresses. Breathe deeply and relax : Expressing can be a stressful experience until you get the hang of it, so once you’re in position and have your pump ready to go, take some slow, relaxing breaths. Slow breathing calms your nervous system and is a good way to get yourself in the zone. Try breathing in for the count of 5, pausing, then exhaling for the count of 6. Repeat until relaxed. Encourage let-down : In the absence of a sucking baby, encouraging let-down can be one of the trickiest parts of pumping. A soft massage before pumping coupled with a warm compress like a wheat bag can help get your milk-makers ready to go. Thinking about your baby (if he’s not with you) or looking through photos or videos (you’ll likely have a few) will also assist. Resist bottle-watching : While it’s tempting to stare at the bottle, obsessing over how quickly (or slowly) it’s filling up – it won’t help! Just like the old saying ‘A watched pot never boils’, a watched bottle doesn’t fill. It’s tough to be relaxed while compulsively watching your milk ducts do their thing. If you really can’t resist the urge, throw a blanket over the bottle, and go for the big reveal several minutes later. Don’t waste a drop : Seeing any of that precious milk wasted is slightly soul-destroying, so be prepared to catch leaks and spills. Haaka has produced a clever little milk collector called the Ladybug that allows you to capture every last drop. You can use it between feeds, or place on your other breast while pumping to capture excess milk that would usually be resigned to a nursing pad. There’s an app for that : If you’re planning on being a regular pumper, an app like Milk Maid will help you keep track of how much you pump, when you’ve pumped and how much you have stored. That’s one less thing for a tired mama to try and remember! Be consistent and persistent Just like anything new, breast pumping has its learning curve. It involves a bit of trial and error to find out what works best for you, and a degree of persistence. And while it might feel strange and uncomfortable early on, the above tips will have it feeling like just another part of your normal baby routine soon enough. Remember, professional help is always available too if you need it.
Learn more
Breastfeeding Basics and Tips
Understanding the Fundamentals of Breastfeeding Breastfeeding might seem straightforward, but many new moms find it challenging. Patience is essential, and being well-prepared can make the process smoother. Here, we break down the basics to help you get ready for this journey. The Three Stages of Breast Milk Colostrum: The First Stage When your baby is born, your body produces colostrum, a clear or yellowish liquid packed with nutrients, proteins, and vitamins. This small amount is perfect for newborns, helping to protect their digestive tract and immune system. Transitional Milk: The Second Stage Regular breastfeeding will stimulate the production of transitional milk, which appears around the third to fifth day. It looks like a mix of milk and orange juice, rich in lactose, fat, and calories. Mature Milk: The Third Stage By the second week, mature milk replaces transitional milk. This pale, sometimes bluish milk provides all the nutrients, fat, and proteins your baby needs, adjusting its water content in hot weather and boosting antibodies when needed. Achieving a Good Latch Proper latching is crucial to prevent discomfort. A good latch covers both the nipple and the areola and shouldn't be painful. Here’s how to ensure a successful latch: Positioning Your Baby Hold your baby tummy-to-tummy with your breasts, keeping their head aligned with their body. Mouth to Nipple Tickle your baby’s lips with your nipple or express a bit of milk to encourage the rooting reflex. When your baby opens wide, bring them to your breast. Ensuring Proper Attachment A proper latch involves the baby’s chin and nose touching your breast. If necessary, adjust the bottom lip to ensure it isn’t tucked in. Watch for a steady suck-swallow-breathe pattern. Trying Different Positions If you encounter difficulties, experiment with different breastfeeding positions like the football hold or side-lying. Consult a lactation consultant if needed. Maintaining Comfort and Milk Supply Relax and Feed on Demand Stay calm and relaxed to enhance milk production. Allow your baby to feed without time limits, ensuring one breast is fully drained before switching to the other. Recognizing Hunger Cues Signs of hunger include nuzzling your breasts, rooting, sucking on hands or clothing, and making lip-smacking noises. Crying is a late hunger cue. Feeding Frequency Newborns typically feed 8-12 times a day. Some may need to be woken up for feeds if they sleep for more than six hours. Patience and Persistence Breastfeeding takes time and practice. Be patient with yourself and your baby, seeking professional help if needed. With time, breastfeeding will become more natural and enjoyable for both of you. By following these tips, you can create a calm and successful breastfeeding experience, eventually making it look effortless.
Learn more