


Digital Baby Scale
Digital Baby Scale
SKU:SCS1100
In stock
Couldn't load pickup availability
Overview
Overview
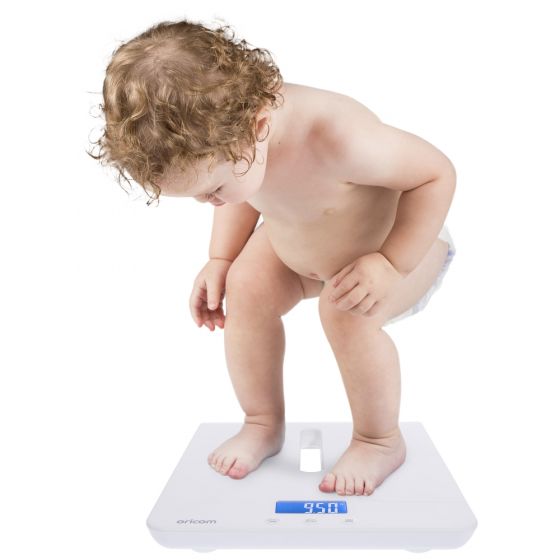
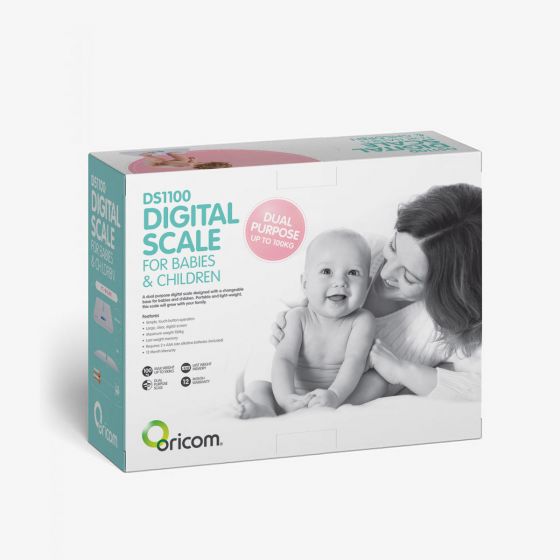
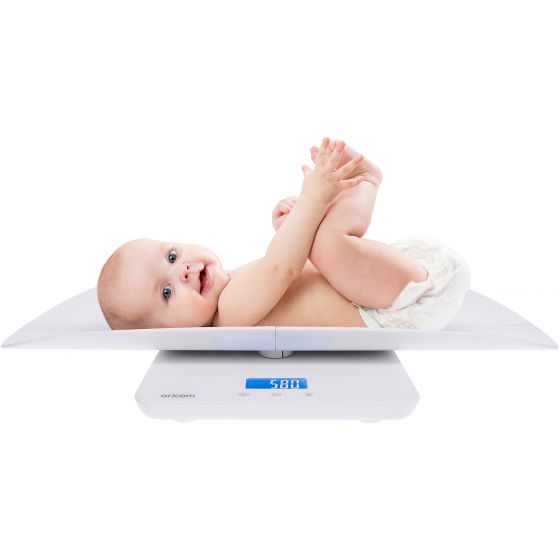
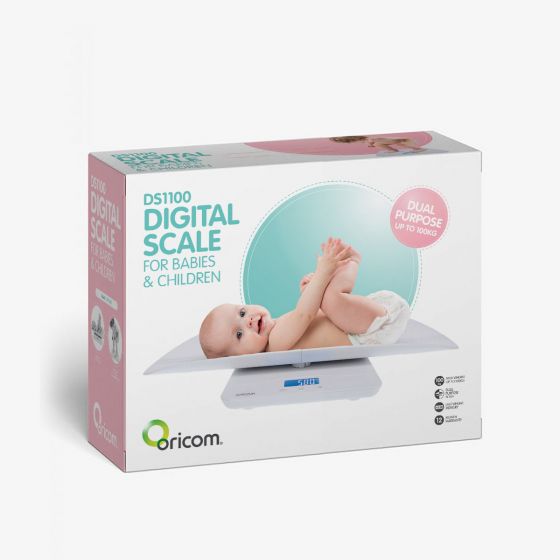
A dual purpose digital scale designed with a changeable base for babies and children up to 100kg. These digital baby scales are portable and lightweight, and this polished unit has been designed to grow with your child.
Simple and intuitive, the touch button operation and large clear digital screen make taking and recording your child’s weight as easy as possible.
Key Features
Key Features
Delivery and Returns
Delivery and Returns
- Delivery: Free within NZ on orders over $100 (excluding bulky items) or $8 standard shipping
- Returns: Accepted within 14 days of receipt with proof of purchase
- Some items are excluded from returns including sale items, hardware, car seats, prams, monitors and personal items - please click here for the full list.
Share this product
Recently Viewed Products
Related Blogs

Breastfeeding Basics and Tips
Understanding the Fundamentals of Breastfeeding Breastfeeding might seem straightforward, but many new moms find it challenging. Patience is essential, and being well-prepared can make the process smoother. Here, we break down the basics to help you get ready for this journey. The Three Stages of Breast Milk Colostrum: The First Stage When your baby is born, your body produces colostrum, a clear or yellowish liquid packed with nutrients, proteins, and vitamins. This small amount is perfect for newborns, helping to protect their digestive tract and immune system. Transitional Milk: The Second Stage Regular breastfeeding will stimulate the production of transitional milk, which appears around the third to fifth day. It looks like a mix of milk and orange juice, rich in lactose, fat, and calories. Mature Milk: The Third Stage By the second week, mature milk replaces transitional milk. This pale, sometimes bluish milk provides all the nutrients, fat, and proteins your baby needs, adjusting its water content in hot weather and boosting antibodies when needed. Achieving a Good Latch Proper latching is crucial to prevent discomfort. A good latch covers both the nipple and the areola and shouldn't be painful. Here’s how to ensure a successful latch: Positioning Your Baby Hold your baby tummy-to-tummy with your breasts, keeping their head aligned with their body. Mouth to Nipple Tickle your baby’s lips with your nipple or express a bit of milk to encourage the rooting reflex. When your baby opens wide, bring them to your breast. Ensuring Proper Attachment A proper latch involves the baby’s chin and nose touching your breast. If necessary, adjust the bottom lip to ensure it isn’t tucked in. Watch for a steady suck-swallow-breathe pattern. Trying Different Positions If you encounter difficulties, experiment with different breastfeeding positions like the football hold or side-lying. Consult a lactation consultant if needed. Maintaining Comfort and Milk Supply Relax and Feed on Demand Stay calm and relaxed to enhance milk production. Allow your baby to feed without time limits, ensuring one breast is fully drained before switching to the other. Recognizing Hunger Cues Signs of hunger include nuzzling your breasts, rooting, sucking on hands or clothing, and making lip-smacking noises. Crying is a late hunger cue. Feeding Frequency Newborns typically feed 8-12 times a day. Some may need to be woken up for feeds if they sleep for more than six hours. Patience and Persistence Breastfeeding takes time and practice. Be patient with yourself and your baby, seeking professional help if needed. With time, breastfeeding will become more natural and enjoyable for both of you. By following these tips, you can create a calm and successful breastfeeding experience, eventually making it look effortless.
Learn more
Tummy Time for Baby's Development
Tummy Time: Why It Matters (and How to Make It Easier) Tummy time is one of those things you hear about early on in parenthood - right up there with sleep routines, feeding cues, and learning to drink a hot cup of tea while it's still warm! It’s recommended for your baby’s development, but the reality is, many little ones aren’t too thrilled about it at first. The good news? There are ways to make it easier for both of you. Before we get into the tips and tricks, let’s take a quick look at what tummy time actually is, and why it matters so much. Why is tummy time important? When your baby spends time on their tummy (while awake and supervised), they’re doing more than just working those tiny muscles. Tummy time plays a key role in helping to: Strengthen their neck, shoulders, arms, and back Support healthy motor development (like lifting their head, rolling over, and eventually crawling) Prevent flat spots on the back of their head (also known as positional plagiocephaly) It’s also laying the groundwork for milestones down the track. Chiropractor Dr Ainslee explains that, “Research has confirmed that tummy time not only helps children meet gross motor milestones like crawling, walking, and jumping. It also supports their social, cognitive, and learning development later in life.” So, what counts as tummy time? Tummy time doesn’t always have to mean placing your baby directly on the floor. It’s any time your baby is tummy-down while they’re awake and being supervised. Dr Ainslee puts it beautifully - it’s about “handling a baby in a way that naturally facilitates the development of interactive head control.” That means there are lots of ways to fit tummy time into your daily routine - even in those early newborn weeks. Gentle ways to start tummy time If your baby isn’t loving tummy time just yet, that’s okay. Start small and keep it gentle. Chest-to-chest: One of the easiest and most comforting ways to begin. Lie back and place your baby tummy-down on your chest. Skin-to-skin adds even more benefits. Football hold: Hold your baby tummy-down along your forearm, with your hand supporting their tummy and your other hand under their head. Keep them close - this one’s great for newborns. Across your lap: Another simple option that gives your baby some tummy time and lets you sneak in a burp or a cuddle. Baby expert Dorothy Waide encourages parents to start early, even just for a few seconds at a time. “The sooner you start, the quicker baby will adapt. If you begin with short bursts after each nap, you’ll soon find your little one starts to enjoy it more and more.” Making tummy time fun Tummy time doesn’t have to feel like a chore - for either of you. The more engaging it is, the more likely your baby will stick with it (and enjoy it too!). Try: Getting down to their level: Lie on the floor beside them, chat, sing, or just keep them company. Using mirrors or books: A mirror or a high-contrast board book placed in front of your baby can be fascinating for those curious eyes. Sensory toys: Toys like this Farm Activity Playmat are designed to make tummy time more exciting. It includes a removable cushion, a flip-up mirror, a delightful 3D farm animal, a squeaker animal, a teething toy, and an array of textures to touch and feel, making it an ideal companion for endless fun and learning. Supportive gear that can help The Little Bee by Dimples Baby Lounger is a handy tool for tummy time. It’s designed with a gently raised end that gives your baby the right angle to strengthen their upper body muscles in a supported way. The flat end provides a comfy space for rest - so it’s a multitasker. The Doomoo Softy is another great tummy time option — especially for younger babies. Drape your little one over the soft cushion so their arms and chest rest on it. It gently raises their upper body, helping them lift their head and build strength without feeling too flat on the floor. Plus, it doubles as a comfy feeding or lounging cushion when tummy time’s done. The takeaway? You don’t have to do it all at once — and your baby doesn’t have to love it right away. Like most things in early parenthood, tummy time is a journey. Start slow, keep it playful, and know that every minute counts. If you’re looking for supportive products to make tummy time easier, explore our collection of sensory play mats, baby loungers, and purpose-designed tummy time toys. You've got this.
Learn more
Formula and bottle-feeding tips for new parents
Everything you need to know about bottle feeding During the first year, your baby goes through a great deal of growth and development. Most babies triple their birth weight by the time they hit their first birthday – so it’s no wonder they need lots of energy to grow! While it’s widely acknowledged that ‘breast is best’, choosing how you feed your baby is an important and completely personal decision. For some women, personal circumstance, cultural beliefs and physical or mental wellbeing mean breastfeeding isn’t an option, and therefore a safe alternative is required. If you’ve decided to bottle-feed (if you’re thinking about it, speak with your midwife, doctor or nurse first), it’s vital to have clear and well-informed information on the safe preparation and use of formula. Here’s what you need to know about formula-feeding your wee one: About baby formula Most formula is made from modified cow’s or goat's milk so the protein level isn’t too high and babies can digest it. Unlike regular milk, formula has added minerals, vitamins, and fats essential for human growth and development, and when prepared correctly, it contains enough nutrients for healthy growth in babies. In New Zealand, there are strict manufacturing regulations in place to make sure that the formula in your local supermarket is always of good quality and safe for your baby. But that doesn’t make the baby aisle any less overwhelming. Here’s a quick breakdown of the kinds of formula you can buy: Cow’s-milk formula Most cow’s-milk formulas sold in New Zealand have a similar nutritional profile – so price doesn’t necessarily mean one is better than another. Casein and whey are the proteins in breastmilk, and cow’s-milk formula has the same proteins. It will either have more casein or more whey – you can find the percentage of each noted on the formula’s ingredient label. Key points: Your baby’s first formula should contain whey as the main type of protein, as it’s the easiest to digest. Some formulas will be labelled ‘follow-on’ or ‘step 2’ – these are casein-dominant formulas best suited for babies aged six months and over. They’re also designed for hungrier babies who are not yet old enough to start solid food. Your baby can stay on the first formula for 12 months and as you start to introduce solids. If your child isn’t reacting well to cow’s-milk formula and you suspect an allergy, it’s best to seek advice from a healthcare professional who can advise you on alternative types of formula. Goat’s-milk formula This type of formula also contains whey and casein proteins, but the casein protein is slightly different from that in cow’s milk. It contains beta-casein (rather than alpha-casein) which is more easily digestible. Again, you can find the protein ratios outlined on the nutritional label. Soy infant formula Made using soya beans as a source of protein, soy infant formula is a vegetarian option. It’s best to seek advice from a healthcare professional before switching to the soy alternative. Gold formula Gold formula contains extra ingredients which aren’t strictly necessary for your baby – but may be beneficial. Here we explain a few: Long-chain polyunsaturated fatty acids (LCPUFAs). Thought to be important in the development of the brain and eyes. Alpha-lactalbumin. Thought to be nutritious for babies because it’s the main type of whey protein in breastmilk. Pro and prebiotics. These help promote the growth of good bacteria and may help maintain a healthy balance of gut bacteria. May be good for eye health. How to prepare baby formula Before you get started, always carefully read and follow the instructions on the formula tin – not all formulas have the same size scoops or are prepared in the same way. Check the use-by date and dispose of formula if it has expired. Bottle-feeding equipment Here’s what you’ll need to bottle-feed: Large bottles (saves you buying new ones as your baby grows) Bottle rings and caps Teats (either silicone or latex is fine, graded according to size of the hole or age of the baby) Bottle brushes Teat brushes A steriliser (optional) Check our handy guide to bottles and teats here! Making up a bottle of formula Step 1 : Boil the kettle and let the water cool for about 30 minutes, until it has reached a lukewarm temperature. You can also do this in advance, storing the cooled boiled water in sterilised bottles in the fridge. Step 2 : Pour the lukewarm water into the bottle before carefully adding the scoops of formula powder (levelling the powder with a clean knife or the tin's in-built level). Seal the bottle with a ring and cap, then shake gently to encourage the powder to dissolve. Step 3 : Before feeding your baby, check the temperature of the formula by tipping a few drops on the inside of your wrist – it should feel lukewarm. Never add anything to the formula, and if your baby doesn’t finish the bottle, throw any leftover formula away within an hour. Warming infant formula If you are not feeding your baby straight away, place formula in the fridge immediately (store at the back of the fridge) with a cap over the teat to prevent contamination. It can be stored for a maximum of 24 hours. Once removed, it’s only safe to use for up to one hour. The safest way to warm formula is to stand the bottle in a bowl of warm water for no longer than 10 minutes as harmful bacteria can grow in prepared formula. After warming, gently swirl the bottle to mix the formula, and test the temperature. If it’s too hot, cool it down by putting it in a bowl of cold water or by running it under the cold tap. Microwaving bottles is not recommended because uneven heating of the milk can burn your baby’s mouth. Cleaning and sterilising Hygiene is essential – your baby’s immune system isn’t strong enough to fight off some diseases yet, and formula-fed infants are at higher risk of gastrointestinal infection. You need to clean your bottles, teats, rings and caps after every feed and before you sterilise them. Tips for cleaning bottle-feeding equipment: Wash all bottles, rings, caps and teats in hot soapy water. Squirt water through the teat holes and use a bottle brush to ensure that everything is scrupulously clean, getting into all those nooks and crannies, then rinse well. Check for any cracks in the teats and throw away any damaged ones. Rinse everything well in hot water and leave them to air dry. After you’ve cleaned your equipment, you need to sterilise everything by boiling, steaming, or with chemicals. Boiling - To sterilise a baby bottle by boiling, place the disassembled bottle parts into a large pot and cover them fully with water. Bring the water to a rolling boil and let it boil for at least 5 minutes to ensure all parts are thoroughly sterilised. Use clean tongs to remove the items and place them on a clean, dry surface to air dry completely. You can buy electric (plug-in) or microwave steam sterilisers. These units 'cook' your equipment at a temperature high enough to kill bacteria. If using chemical sterilisers , follow the instructions on the box or packet. If you’re unsure, seek help from a professional Don’t be afraid to take your time deciding about feeding your baby. The most important consideration is that your baby is comfortable and well-fed, and you’re able to enjoy this special (albeit exhausting!) time with your newborn. Get the information you need to make an informed decision, and if you’re not sure, consult with your health professional, who’s in the best position to give you accurate advice for your baby and his or her needs.
Learn more
Bottle-feeding: choosing the right bottles and teats
Choosing the Right Bottle & Teat for Your Baby A Practical Guide to Finding the Right Bottle Feeding Setup We’ve been helping families for many years now, and a question we are always asked by new parents is “Which is the best baby bottle?” - and while we wish there was a one size fits all answer to this question, the reality is that there isn't one perfect bottle for every baby. The best baby bottle is the one that suits your bub's feeding style, comfort, and stage of development, while also fitting your family's routine and preferences. Finding the right bottles and teats can sometimes feel overwhelming. With so many options available, from anti colic bottles and wide neck designs to glass, silicone, and plastic bottles… it's natural to wonder which choice is best for your baby. In this guide, we'll help you understand the different bottle and teat options so you can find a feeding setup that feels right for your baby and your family. How to Choose the Best Baby Bottle When comparing baby bottles, start by thinking about your baby's feeding needs rather than focusing on brands or features. Newborn? Look for slow flow teats and easy to clean bottles – you’ll likely be using up to 12 bottles a day in those very early stages! Breastfed or mixed feeding? Wide neck bottles and breast shaped teats can help support a natural latch. Experiencing wind or reflux? Anti-colic bottles will help reduce swallowed air. Need something practical for everyday use? Lightweight plastic bottles are often a great choice. Looking for a long term option? Glass bottles are durable and long lasting. Choosing the Right Bottle MaterialDifferent bottle materials offer different benefits, but there isn't a single right choice. Bottle Type Best For Things to Know Plastic Everyday use Lightweight and practical Glass Durability Easy to clean but heavier Silicone Mixed feeding Soft and flexible 💛 Dimples Tip: Something we often tell parents is not to overthink the bottle material too much. Most babies will adapt well to different bottle types, so it's often more about what works best for your family and feeding routine. Bottle Shapes at a Glance Standard Bottles - A simple, reliable option that works well for most babies. Wide-Neck Bottles - Easier to fill and clean, and often preferred by families combining breast and bottle feeding. Anti-Colic Bottles - Designed to reduce the amount of air swallowed during feeding. 💛 Something we get asked a lot at Dimples: "Are anti colic bottles really worth it?" For babies who experience wind, gas, or reflux, or even for as a preventative method – yes! We know many parents who have found they make feeding more comfortable and reduce post feed fussiness. Explore our bottle range here Explore our Infant and Toddler Formula range here Best Bottles for Breastfed Babies & Mixed Feeding Another common question we hear at Dimples is: "What's the best bottle for a breastfed baby?" While every baby is different, wide-neck bottles with soft silicone teats are often a great place to start. When introducing a bottle to a breastfed baby, look for: Wide teats that encourage a natural latch Slow flow teats that mimic breastfeeding Soft silicone teats with a familiar feel Bottles designed to support mixed feeding Many parents also find paced bottle feeding helpful, as it encourages babies to feed at a rhythm that's closer to breastfeeding. You can learn more about paced bottle feeding here. Shop bottles suitable for mixed feeding Choosing the right teat flow can make feeding feel calmer and more comfortable for your baby. For newborns and younger babies, a slow flow teat is usually the best place to start. This helps milk flow gently and steadily, giving your baby time to feed at their own pace. As your baby grows and becomes more confident with bottle feeding, they may be ready for a medium or faster flow teat. Age guides can be helpful, but your baby's feeding cues are often the best sign. The flow may be too fast if your baby is coughing, spluttering, gulping milk, leaking milk from their mouth, or becoming unsettled during feeds. The flow may be too slow if your baby seems frustrated, takes a very long time to finish a bottle, or often falls asleep before finishing their feed. 💛 Another common questions we are asked: "When should I move up a teat size?" The answer is usually based on your baby's feeding cues rather than just their age alone. Shop our teat range here Cleaning, Sterilising & Bottle Care Keeping bottles and teats clean is a very important part of bottle feeding. Wash bottles and teats thoroughly, replace worn teats when needed, and sterilise bottles up until your baby is approximately 12 months old. A few simple essentials can make life easier: Bottle sterilisers Bottle warmers Bottle brushes Drying racks Feeding bibs Shop bottle cleaning and sterilising essentials here Frequently Asked Questions about Bottle Feeding What bottles are best for newborns? Most newborns do well with bottles fitted with slow flow teats. Anti-colic designs can also be helpful for babies prone to wind or reflux. What bottle is best for a breastfed baby? Wide-neck bottles with soft silicone teats are often a great option for supporting mixed feeding and encouraging a natural latch. Are anti-colic bottles worth it? For babies who swallow excess air while feeding, anti-colic bottles may help reduce wind, gas, and feeding discomfort. How do I know if teat flow is too fast? Look for coughing, spluttering, milk leaking from the mouth, or your baby struggling to keep up with the flow. Glass vs plastic baby bottles: which is better? Both are excellent options. Plastic bottles are lightweight and practical, while glass bottles are durable, easy to clean, and resistant to staining. Finding the Right Feeding Fit for Your Family Every baby is different, and finding the best baby bottle often involves a little trial and error. Trust your baby's cues, be kind to yourself, and remember that there's no single "right" choice. What matters most is finding a feeding setup that feels comfortable for both you and your baby. 💛 A final note from our team: We've helped hundreds of New Zealand families navigate bottle feeding over the years, and if there's one thing we've learned, it's that every feeding journey looks a little different. You're doing a great job. Shop our full range of baby bottles, teats and feeding essentials
Learn more