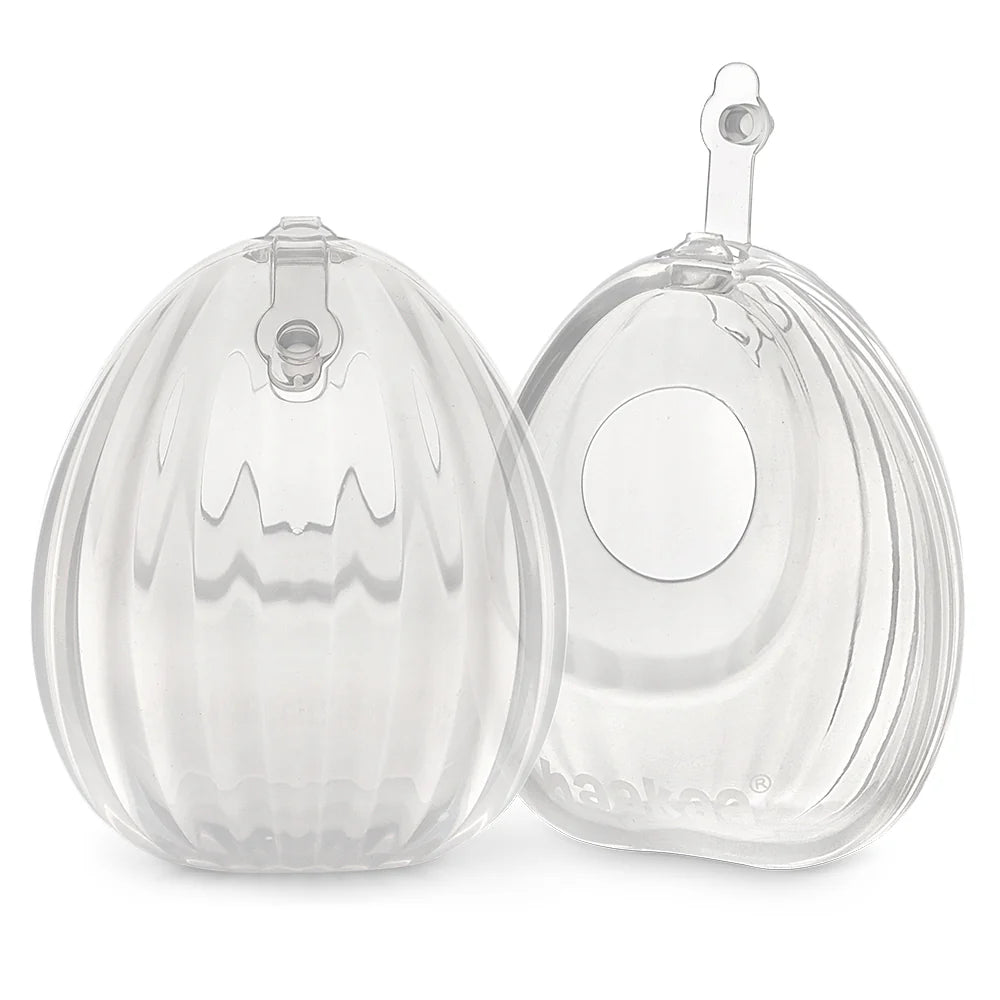


Wearable Silicone Breast Pump 75ml
Wearable Silicone Breast Pump 75ml
SKU:MHK183
Clothing Prem to 18 Months
| Size | Age Guide | Weight | Height |
|---|---|---|---|
| Premature | Premature or Small Newborn | Up to 4Kg | Up to 55cm |
| Newborn | 0-3 months | 4-6Kg | Up to 62cm |
| 3 Month | 3-6 months | 6-8Kg | Up to 68cm |
| 6 Month | 6-12 Month | 8-10Kg | Up to 76cm |
| 12 Month | 12-18 Month | 10-12Kg | Up to 84cm |
| 18 Month | 18-24 Month | 12-14Kg | Up to 92cm |
Clothing 2 to 6 Years
| Size | Age Guide | Height | Chest | Waist | Hip |
|---|---|---|---|---|---|
| 2 Year | 2-3 Years | Up to 100 cm | 56 | 51 | 58 |
| 3 Year | 3-4 Years | Up to 105 cm | 58 | 53 | 60 |
| 4 Year | 4-5 Years | Up to 110 cm | 60 | 55 | 62 |
| 5 Year | 5-6 Years | Up to 115 cm | 62 | 57 | 64 |
| 6 Year | 6-7 Years | Up to 120 cm | 64 | 59 | 66 |
Beanie Size Guide
| Size | Head Circumference | Age Guide |
|---|---|---|
| Premature | 31-35 cm | Premature or Small Newborn |
| Newborn | 35-40 cm | Newborn |
| Small | 40-43 cm | 3-6 Months |
| Medium | 43-47 cm | 6-18 Months |
| Large | 47-52 cm | 18-3 Years |
Sunhat Size Guide
| Size | Head Circumference | Age Guide |
|---|---|---|
| Newborn | 37-40 cm | Newborn |
| Small | 40-43 cm | 3-6 Months |
| Medium | 43-46 cm | 6-12 Months |
| Large | 46-49 cm | 12-24 Months |
| Xtra Large | 49-54 cm | 2-4 Years |
Sleep Pods Size Guide
| Size | Weight | Age Guide | Measurement(Back to Hem) |
|---|---|---|---|
| Newborn | 0-6 kgs | 0-3 Months | 60.5 cm |
| Small | 0-8 kgs | 3-6 Months | 66 cm |
Booties Size Guide
| Size | Age Guide |
|---|---|
| Newborn | 0-3 Months |
| Small | 3-6 Months |
| Medium | 6-12 Months |
| Large | 12-18 Months |
Pretty Brave Baby
| Foot Length (mm) | Insole Length (mm) | EU | UK | Age | INT |
|---|---|---|---|---|---|
| 95-104 | 110 | 16/17 | 2 | 0-6m | S |
| 104-114 | 118 | 18 | 3 | 6-12m | M |
| 114-123 | 127 | 19/20 | 4.5 | 12-18m | L |
| 123-137 | 142 | 21/22 | 5.5 | 16-22m | XL |
Pretty Brave 1st Walker
| Foot Length (mm) | Insole Length (mm) | EU | UK | Age |
|---|---|---|---|---|
| 114-120 | 125-128 | 19 | 3 | 1 yr |
| 120-126 | 132-135 | 20 | 3.5 | 1-2 yrs |
| 126-132 | 138.5-141.5 | 21 | 4.5 | 1-2 yrs |
| 132-138 | 145-148.5 | 22 | 5 | 2 yrs |
Crywolf Swim Nappy
| Size | Length (waist to crotch) | Crotch Width (side to side) |
|---|---|---|
| 0-1 yr | 1-2 yrs | |
| 37 | 38 | |
| 14.5 | 15.5 |
Crywolf Rash Suit
| Size | Length (back neck to crotch) | Chest (arm to arm) | Waist (side to side) | Sleeve (neck to cuff) | Neck Opening(diameter) |
|---|---|---|---|---|---|
| 6-12 Months | 1 yr | 2 yrs | 3 yrs | ||
| 40 | 42 | 44 | 46 | ||
| 25 | 26 | 27 | 28 | ||
| 24 | 25 | 26 | 27 | ||
| 30 | 31.5 | 33 | 34.5 | ||
| 13.25 | 13.25 | 13.8 | 14.3 |
Low stock
Couldn't load pickup availability
Overview
Overview
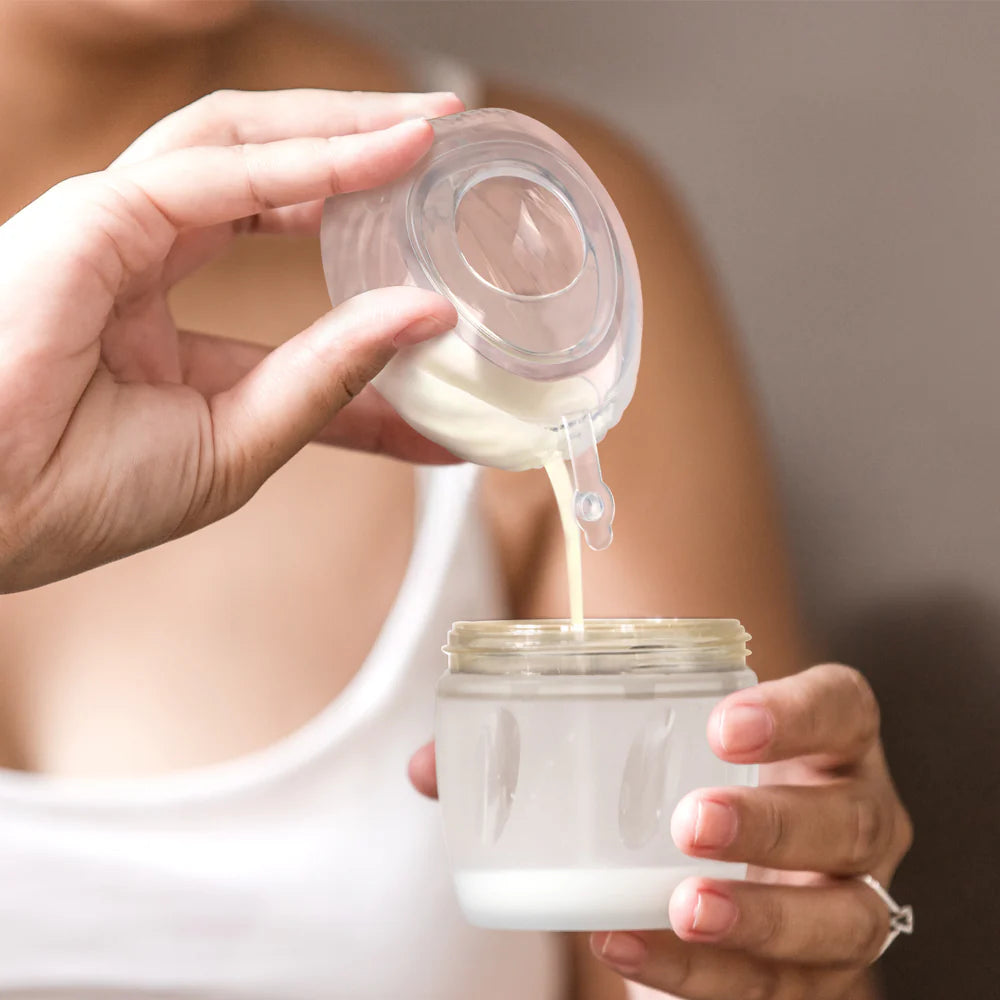
Breast pump or milk collector—why choose when you can have both?
Meet the Shell Wearable Silicone Pump, a smart combination of our original Silicone Breast Pumps and the Ladybug Milk Collector! This handy device works as a wearable shell pump, making it perfect for those busy days when you need to pump but can't slow down. Just press the back, attach it to your breast, slip your bra back on, and continue with your day! Adjust the suction strength easily with a quick tweak of the valve.
If you're only looking to collect a bit of leakage, simply remove the plug to eliminate suction, place the Shell in your bra, and let it passively collect what's naturally leaking. It's the ideal solution for any situation. The Shell lies flat when it's time to empty, preventing spills, and the easy-pour outlet ensures you can transfer your precious milk into a bottle or storage container mess-free. Easy to use and clean, the Haakaa Shell is the perfect choice for mums who need both a pump and a collector.
What's Included
What's Included
Technical Specification
Technical Specification
User Guide
User Guide
Delivery and Returns
Delivery and Returns
- Delivery: Free within NZ on orders over $100 (excluding bulky items) or $8 standard shipping
- Returns: Accepted within 14 days of receipt with proof of purchase
- Some items are excluded from returns including sale items, hardware, car seats, prams, monitors and personal items - please click here for the full list.
Share this product
Recently Viewed Products
Related Blogs

Tips & Tricks - Cleaning your Carseat
How to Keep Your Car Seat Clean (and Looking Like New!) Parents and caregivers know that washing can quickly take over your life when you’ve got little ones around – especially when it comes to car seats! Kids, being kids, seem to have a knack for turning a spotless, brand-new car seat into a treasure trove of crumbs, spills, and, well, the occasional bodily fluid. While it would be ideal to ban all food and drink from the car seat (let's face it, that’s easier said than done!), prevention is key. A full-sleeved bib worn over the straps can help catch any messes before they even get the chance to make a mark. If a major mess happens (think: vomit, diaper leaks, or spilled drinks), the sooner you clean it up, the better. In between those big cleans, a quick vacuum once a week can keep things under control and prevent crumbs from piling up. For extra protection, consider using protective car seat covers or mats to catch any messes that could cause long-term damage to your car. Here are some simple steps to keep your car seat looking fresh and clean: 1. Vacuum Your Seat Give your seat a quick shake to loosen any crumbs or debris, then vacuum up the mess before removing the car seat for a deeper clean. This will stop any stray bits from making a mess as you go! 2. Remove and Wash the Car Seat Covers Start by checking your car seat’s instruction manual for cleaning guidelines. Many car seat covers are machine washable, but some may require hand washing. Be sure to note any special instructions about detergent, water temperature, or removable parts. Pro tip: Take a few photos or a video as you remove the covers. This can be a lifesaver when it's time to reassemble! A gentle, mild detergent or just soap and water are typically your best bet. Avoid bleach or harsh chemicals, as these can damage or weaken the fabric. When it comes to drying, line drying is your safest option, as most car seat covers can't go in the dryer. Give them plenty of time to air out and dry completely. 3. Clean the Harness & Straps Use a non-abrasive cloth and warm water to spot clean the harness and straps. Follow your manual’s instructions, as some manufacturers allow using soapy water, while others may not. 4. Clean the Buckles Buckles are critical for keeping your child safe, so avoid submerging them in water or using any lubricants. Instead, spot clean them with warm water and a soft cloth, keeping them free from soap or cleaning products. 5. Clean the Shell Vacuum the car seat shell to catch any loose bits, then use an old toothbrush or cotton bud to get into those tricky nooks and crannies. A damp cloth can help wipe down any sticky or dirty areas. Make sure the shell is fully dry before putting everything back together. 6. Reassemble Your Seat If you took photos or videos while disassembling, now is the time to refer back to them! Check your manual to ensure all parts are correctly reassembled, and give the harness and buckles a final check to ensure they’re securely fitted and ready for your little one. Note: This guide is intended to help with your car seat cleaning routine, but always follow the manufacturer’s specific instructions in your car seat manual to keep your warranty intact.
Learn more
Tips for Successful Breast Pumping
How to express breast milk minus the stress 10 simple tips to get the pumping party started Whether a return to work is calling, you’re desperate for a night out or just keen to share the responsibility of feeding your baby, most new mamas eventually need some time off from breastfeeding. Enter the breast pump. While it might seem daunting at first, with tubes, suction and strange noises, it’s not so complicated once you get the hang of it. And just like any new skill, it can take a bit of time to learn. So how do you become a pumping pro? Read on to find out… Get started with the right pump : Before you meet your new baby, it’s a good idea to research, purchase and familiarise yourself with your breast pump. Depending on whether you’re planning on being an occasional pumper or pumping regularly, manual pumps like this one from Haaka and electric pumps like this one from Vital Baby each have different merits. That’s a whole other blog! The pre-pump clean-up : Before you get started, thoroughly wash your hands with soap and water, and ensure you’ve cleaned and sterilised your pump as per the manufacturer’s instructions. If you’re planning on storing the milk, cleanliness is super important to avoid passing any nasties on to your baby. Create a designated pumping spot : Whether it’s at work or home, find a comfortable, quiet spot where you can have some uninterrupted pumping time. Make your go-to spot cosy and relaxing, with everything you need on hand. You’ll want a good book (or your phone) to pass the time, snacks (lactation cookies are perfect), a bottle of water and some soothing nipple cream. Think of pumping as an opportunity for some precious time out rather than a dreaded chore. Get your seating right : Once you’ve found your spot, get your seating sorted. A comfy chair that supports your back is a must for pumping sessions that won’t leave you aching. Make sure your feet are flat on the floor and have a cushion or nursing pillow handy to support your pump-holding arm. Dress for pumping success : A feeding-friendly wardrobe is essential for easy pumping or breastfeeding access. Get the basics right, starting with a comfortable nursing bra like this one from Body Silk and then layer with buttoned shirts from your existing wardrobe or specific nursing tops or dresses. Breathe deeply and relax : Expressing can be a stressful experience until you get the hang of it, so once you’re in position and have your pump ready to go, take some slow, relaxing breaths. Slow breathing calms your nervous system and is a good way to get yourself in the zone. Try breathing in for the count of 5, pausing, then exhaling for the count of 6. Repeat until relaxed. Encourage let-down : In the absence of a sucking baby, encouraging let-down can be one of the trickiest parts of pumping. A soft massage before pumping coupled with a warm compress like a wheat bag can help get your milk-makers ready to go. Thinking about your baby (if he’s not with you) or looking through photos or videos (you’ll likely have a few) will also assist. Resist bottle-watching : While it’s tempting to stare at the bottle, obsessing over how quickly (or slowly) it’s filling up – it won’t help! Just like the old saying ‘A watched pot never boils’, a watched bottle doesn’t fill. It’s tough to be relaxed while compulsively watching your milk ducts do their thing. If you really can’t resist the urge, throw a blanket over the bottle, and go for the big reveal several minutes later. Don’t waste a drop : Seeing any of that precious milk wasted is slightly soul-destroying, so be prepared to catch leaks and spills. Haaka has produced a clever little milk collector called the Ladybug that allows you to capture every last drop. You can use it between feeds, or place on your other breast while pumping to capture excess milk that would usually be resigned to a nursing pad. There’s an app for that : If you’re planning on being a regular pumper, an app like Milk Maid will help you keep track of how much you pump, when you’ve pumped and how much you have stored. That’s one less thing for a tired mama to try and remember! Be consistent and persistent Just like anything new, breast pumping has its learning curve. It involves a bit of trial and error to find out what works best for you, and a degree of persistence. And while it might feel strange and uncomfortable early on, the above tips will have it feeling like just another part of your normal baby routine soon enough. Remember, professional help is always available too if you need it.
Learn more
Trouble Shooting Breastfeeding Issues
When Breastfeeding Gets Tough: What You Can Do Many new mums set out hoping to breastfeed, but once baby arrives, things don’t always go as planned. Painful feeds, engorgement, latch troubles, low supply, clogged ducts, and infections – there are plenty of common hiccups that can make breastfeeding harder than you expected. Add in sleep deprivation, postpartum recovery, and all the well-meaning voices around you, and it’s easy to feel overwhelmed if feeding isn’t going smoothly. If you decide to supplement or switch to formula, there’s no shame in that – a fed baby and a supported mum are what truly matter. But if your heart is set on breastfeeding, the good news is most challenges can be worked through – and often, they’re only temporary. You've got this. Here’s a gentle guide to some of the common hurdles and how to help overcome them: 1. Engorged Breasts When your milk comes in a few days after birth, your breasts may suddenly feel hard, heavy, and tender – this is normal. It’s your body adjusting to baby’s needs. Engorgement usually settles down as milk supply begins to regulate, but it may crop up now and again if you go longer between feeds. What can help: Feed often, even if it’s just a little. If your breasts are too full for baby to latch, try hand expressing a bit first to soften the area. Cold compresses and gentle massage can bring relief. We stock some amazing inserts from Bare Mum which you can pop into your bra to help soothe the area. Some mums also swear by popping chilled cabbage leaves inside their bra between feeds – it’s an old remedy, but surprisingly soothing. 2. Latch Issues A bit of discomfort at the start of feeds is normal, especially in the early days. But if you're experiencing sharp or lasting pain, your baby might not be latching deeply enough. A shallow latch can press your nipple against the roof of their mouth, making it painful for you and less effective for them. What can help: Encourage a wide open mouth by gently rubbing under baby’s chin. Position them with their nose opposite your nipple, then bring them to you (not the other way around). A good latch usually means your baby’s mouth is wide, their chin is tucked into your breast, and your nipple is deep inside. If pain persists or your baby still can’t latch comfortably after a week or two, reach out to your midwife or a lactation consultant. Sometimes structural issues like tongue-tie can make latching difficult, and professional help can make all the difference. 3. Cracked or Bleeding Nipples It sounds scary, but many mums experience cracked or sore nipples in the first week or two. It can happen due to a shallow latch, overuse of a pump, or simply your skin adjusting to feeding. What can help: Use a nipple cream after each feed to soothe and heal. Hydrogel pads can bring instant cooling relief. Taking a mild pain reliever like paracetamol before feeds can help too. Most importantly, check baby’s latch – and ask for help if your nipples aren’t healing. Here are two of our favourite products to help you through: Pure Mama Nipple Butter and Silverette Cups these two in combination with each other should help you heal faster and stay protected. 4. Low Milk Supply It’s common to worry about supply, especially in those early weeks when baby seems to feed non-stop. But frequent feeding, short feeds, and night wakings are all normal and don’t usually mean you’re not making enough milk. True low supply is rare, but if your baby isn’t gaining weight or has very few wet nappies, it’s worth talking to your midwife or GP. Sometimes birth complications or certain medical issues can affect milk production. What can help: If baby is showing signs of dehydration, it’s important to get help quickly. Your healthcare provider may suggest medication or a feeding plan. If you’ve been given the all-clear but still want to increase your supply, try pumping between feeds, eating milk-boosting foods like oats and fennel, or treating yourself to some tasty lactation cookies or this delicious lactation blend. 5. Inverted or Flat Nipples You might not have thought much about your nipple shape before baby arrived – but inverted or flat nipples can make latching trickier. If your nipple pulls inward when gently pinched, it may be inverted. What can help: Most mums with inverted nipples are still able to breastfeed with the right support. Talk to your midwife or lactation consultant – they may suggest trying a nipple shield or using a breast pump briefly before feeding to draw the nipple forward. 6. Blocked Ducts A blocked duct feels like a hard, sore lump under the skin. It usually happens when milk isn’t draining well – perhaps due to a skipped feed or a tight bra. What can help: Keep milk flowing by feeding often on the affected side. Apply a warm compress before feeding and gently massage the lump toward the nipple. Most clogs clear within a day or two. 7. Mastitis If a blocked duct doesn’t clear or if bacteria enters through a cracked nipple, it can cause mastitis – a breast infection. You may feel feverish, achey, and have a red, painful area on your breast. What can help: Mastitis needs medical treatment, so see your GP for antibiotics. Keep feeding or pumping often – it might be sore, but emptying the breast helps you recover faster. Warm or cool compresses between feeds can ease the discomfort. 8. Thrush This yeast infection often begins in baby’s mouth and spreads to the breast. It can cause sharp, shooting pain and red, shiny, itchy nipples. What can help: Thrush won’t go away on its own, so you’ll need to see your GP for antifungal medication for both you and baby. It’s important to treat both of you at the same time to stop it from bouncing back. You Are Not Alone – and You’re Doing Great! Before baby arrives, breastfeeding can feel like it should come naturally – and for some, it does. But if you’re finding it hard, you’re not doing anything wrong. Many new mums face bumps in the road, and most find they only need support for a short time before things click into place. For others, despite trying everything, breastfeeding may not work out – and that’s okay too. You haven’t failed. Formula feeding is a perfectly valid option, and many babies thrive on it. What matters most is that your baby is fed, loved, and cared for – and you’re doing an incredible job. Don’t hesitate to ask for help – whether it’s from your midwife, GP, a lactation consultant, or another mum who’s been through it. And if you don’t feel listened to, keep asking. The right support can make all the difference ❤️
Learn more
Breastfeeding Basics and Tips
Understanding the Fundamentals of Breastfeeding Breastfeeding might seem straightforward, but many new moms find it challenging. Patience is essential, and being well-prepared can make the process smoother. Here, we break down the basics to help you get ready for this journey. The Three Stages of Breast Milk Colostrum: The First Stage When your baby is born, your body produces colostrum, a clear or yellowish liquid packed with nutrients, proteins, and vitamins. This small amount is perfect for newborns, helping to protect their digestive tract and immune system. Transitional Milk: The Second Stage Regular breastfeeding will stimulate the production of transitional milk, which appears around the third to fifth day. It looks like a mix of milk and orange juice, rich in lactose, fat, and calories. Mature Milk: The Third Stage By the second week, mature milk replaces transitional milk. This pale, sometimes bluish milk provides all the nutrients, fat, and proteins your baby needs, adjusting its water content in hot weather and boosting antibodies when needed. Achieving a Good Latch Proper latching is crucial to prevent discomfort. A good latch covers both the nipple and the areola and shouldn't be painful. Here’s how to ensure a successful latch: Positioning Your Baby Hold your baby tummy-to-tummy with your breasts, keeping their head aligned with their body. Mouth to Nipple Tickle your baby’s lips with your nipple or express a bit of milk to encourage the rooting reflex. When your baby opens wide, bring them to your breast. Ensuring Proper Attachment A proper latch involves the baby’s chin and nose touching your breast. If necessary, adjust the bottom lip to ensure it isn’t tucked in. Watch for a steady suck-swallow-breathe pattern. Trying Different Positions If you encounter difficulties, experiment with different breastfeeding positions like the football hold or side-lying. Consult a lactation consultant if needed. Maintaining Comfort and Milk Supply Relax and Feed on Demand Stay calm and relaxed to enhance milk production. Allow your baby to feed without time limits, ensuring one breast is fully drained before switching to the other. Recognizing Hunger Cues Signs of hunger include nuzzling your breasts, rooting, sucking on hands or clothing, and making lip-smacking noises. Crying is a late hunger cue. Feeding Frequency Newborns typically feed 8-12 times a day. Some may need to be woken up for feeds if they sleep for more than six hours. Patience and Persistence Breastfeeding takes time and practice. Be patient with yourself and your baby, seeking professional help if needed. With time, breastfeeding will become more natural and enjoyable for both of you. By following these tips, you can create a calm and successful breastfeeding experience, eventually making it look effortless.
Learn more